Create and structure an event
Create an event from an inquiry or from scratch, set hours for each day, and find the whole file on one page, from hold to the big day.
Aktualisiert am
The event is the central file of a booking: client, dates, venue, spaces, quotes, BEO, conversations, tasks, notes and files. An inquiry becomes an event as soon as a date is on the table, and all the work that follows (quote, follow-ups, logistics, invoicing) starts from this file.
This article shows how to create the event, set different hours on different days, then read and drive its page: tabs, the "To do now" block, the status menu and the details column.
What you'll learn
- Create an event from an inquiry or from scratch.
- Pick several days and different hours for each day.
- Read the event page: tabs, "To do now", details column.
- Change the status and the stage from a single menu.
- Book rooms by slot with the "Room schedule" block.
Prerequisites
- At least one venue in your workspace. Its spaces and catalog are recommended: the calendar then shows the right room and the quote uses the right prices.
- To change an event's status: the Owner, Admin or Member role. The "Operations" and "Read-only" roles see the status but can't change it.
1. Create from an inquiry
Most files start with a client message. Starting from the inquiry avoids retyping and keeps the conversation attached to the event.
- In "Inquiries", open the inquiry and check what Joinways understood: date, guests, budget. Fix anything wrong.
- Click "Convert". The creation window opens, already filled with the contact, company, dates, venue, type, budget and number of guests.
- Check the window, then click "Convert to event" (or Cmd/Ctrl + Enter). The "Open the event after converting" box takes you straight to the new event.
If the inquiry concerns several of your venues, the "Also create a hold for the other venue of this request" box creates one hold per venue, with the same contact and dates. See One request, several of your venues.
2. Create from scratch
For a phone call, a site visit or a referral, create the file by hand.
- In "Events", click "Add an event" (the + button on mobile).
- Fill in at least "Company name", "First name" or "Last name": the event title is built from it.
- At the top of the window, pick the status ("Hold" by default), the venue and the dates. Once the venue is picked, choose the spaces; with no choice, the event takes the "Entire venue".
- Add "Technical needs", "Service needs" and "Event schedule" if needed, then "Pax", "Type", "Email", "Phone", "Budget", "Source" and "External link".
- The event owner, bottom left, is you by default. Click "Create event".
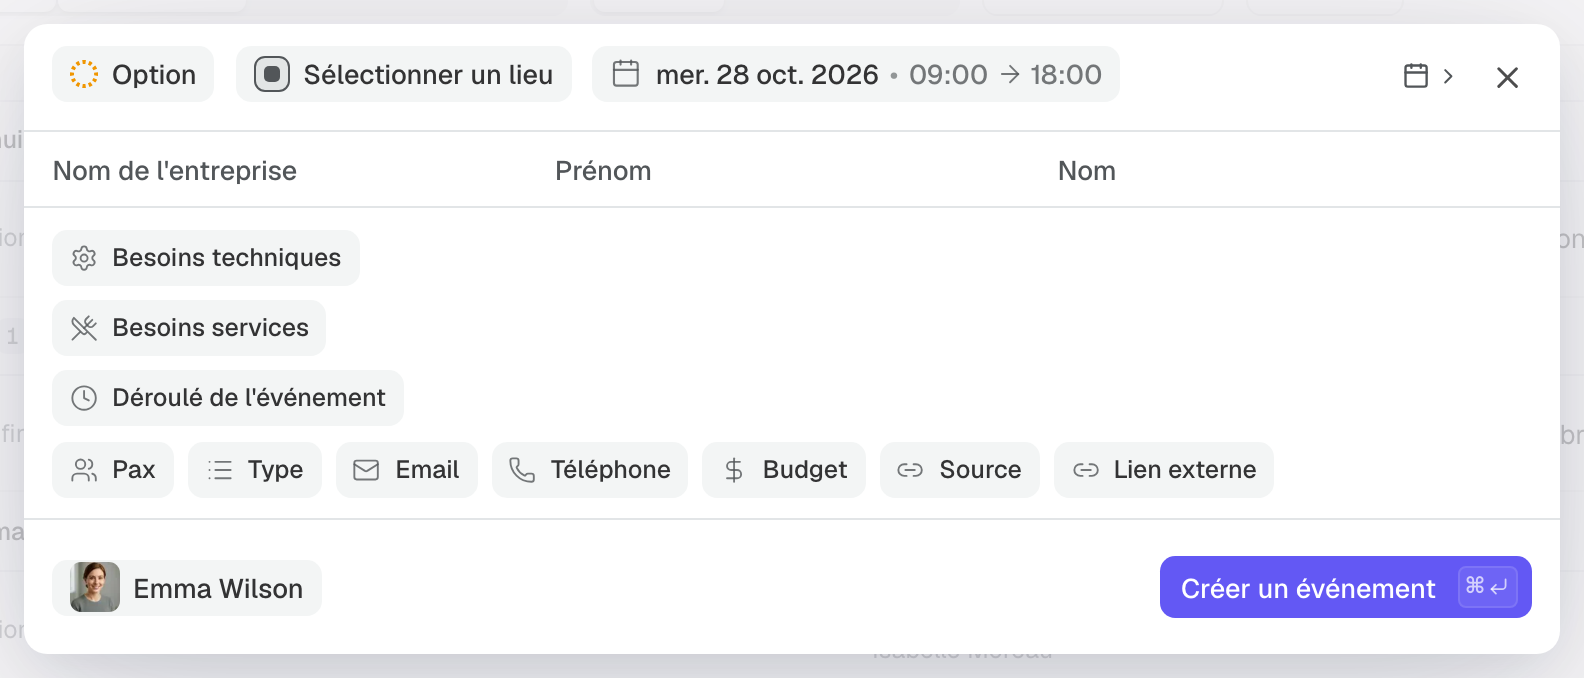
In a workspace with a single venue, that venue is prefilled and the venue picker disappears from the window: only the choice of spaces remains.
As soon as the venue, dates and spaces are set, the window flags events already placed in the same place on the same dates, and the venue's closures. It's a warning, not a block, unless the venue forbids creating events outside opening hours. See Manage availability and avoid double-bookings.
3. Pick the days and hours
Click the date at the top of the window to open the picker. A click adds a day, a second click on a selected day removes it; in the creation window, the first click replaces the date suggested by default. Shift + click fills a whole range. Days don't have to follow each other: a Friday and the next Monday, without the weekend, make one event.
By default, every day has the same hours. Once two or more days are selected, the "Different hours each day" switch appears under the hours.
- Select the days of the event.
- Turn on "Different hours each day". One row appears for each day ("Day 1", "Day 2"…), with its start and end.
- Enter each day's hours. An end before the start finishes the next day, at 06:00 at the latest; beyond that, add a day.
- Click "Save" (or Cmd/Ctrl + Enter).
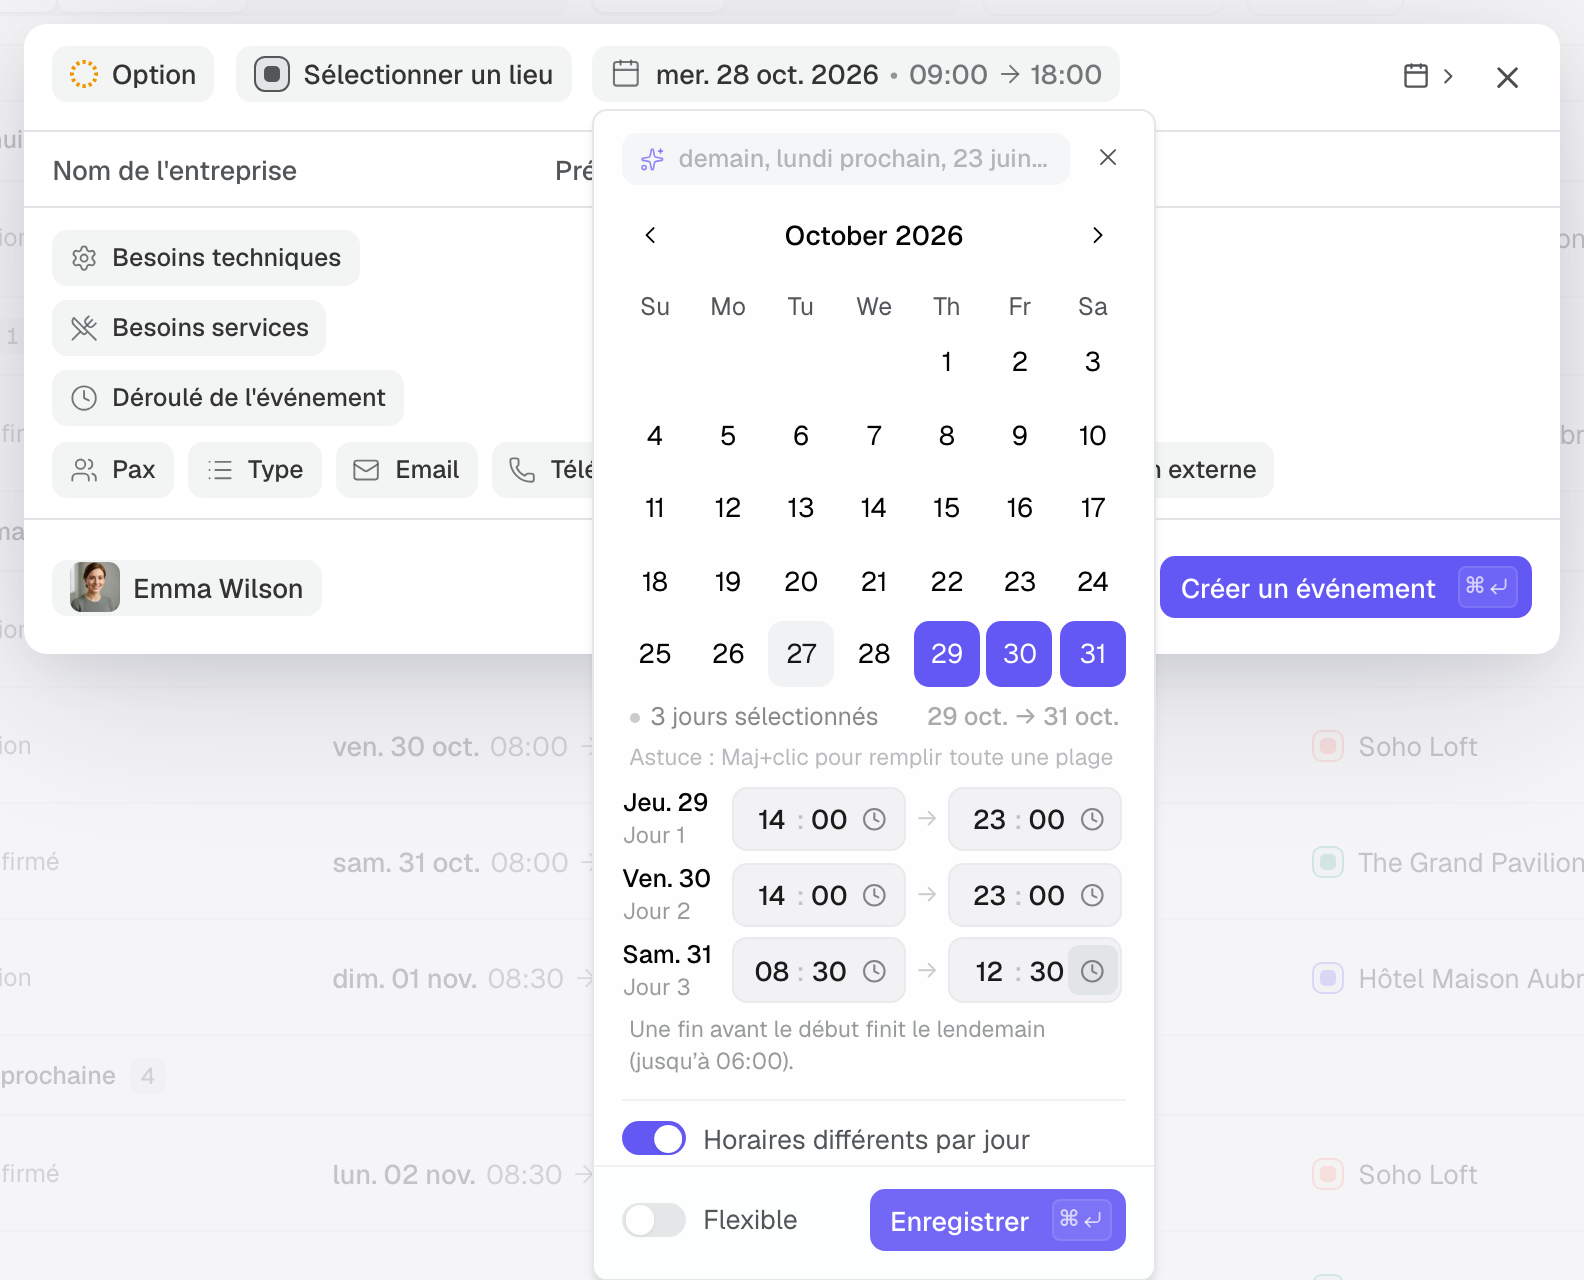
Without hours per day, an end before the start over several consecutive days makes one stay, nights included: for example check-in on Monday at 14:00 and check-out on Wednesday at 11:00. The text field at the top of the picker also accepts a written date ("tomorrow", "next Monday", "June 23").
Hours per day show everywhere: the details column lists each day with its hours (past four days, they move into a tooltip), and the header and the list show for example "3 days · hours per day". They also feed the calendar, availability, the quote, the BEO, the calendar export (ICS), calendar sync and duplication. To change them, click the dates in the details column.
4. Read the event page
The page opens on the "Overview" tab. The header shows the client, the dates and the type; on the right, the "Discussion" button opens the team discussion and the ⋮ menu offers "Copy page URL", "Duplicate event" and "Archive event".
Tabs follow the order of the work: "Overview", "Conversations", "Proposals", "BEO", "Tasks", "Notes", "Files", "History". "History" traces the life of the file (creations, edits, quotes, status changes). On a phone, the first three tabs stay visible and the others move into the "+N" menu.
- A counter follows each tab that holds something: number of emails, quotes, open tasks, notes.
- When a conversation is waiting for the venue's answer, the "Conversations" tab shows "To reply" in orange instead of the email count.
- The "BEO" tab carries a check mark when it's filled in, or the number of items to handle.
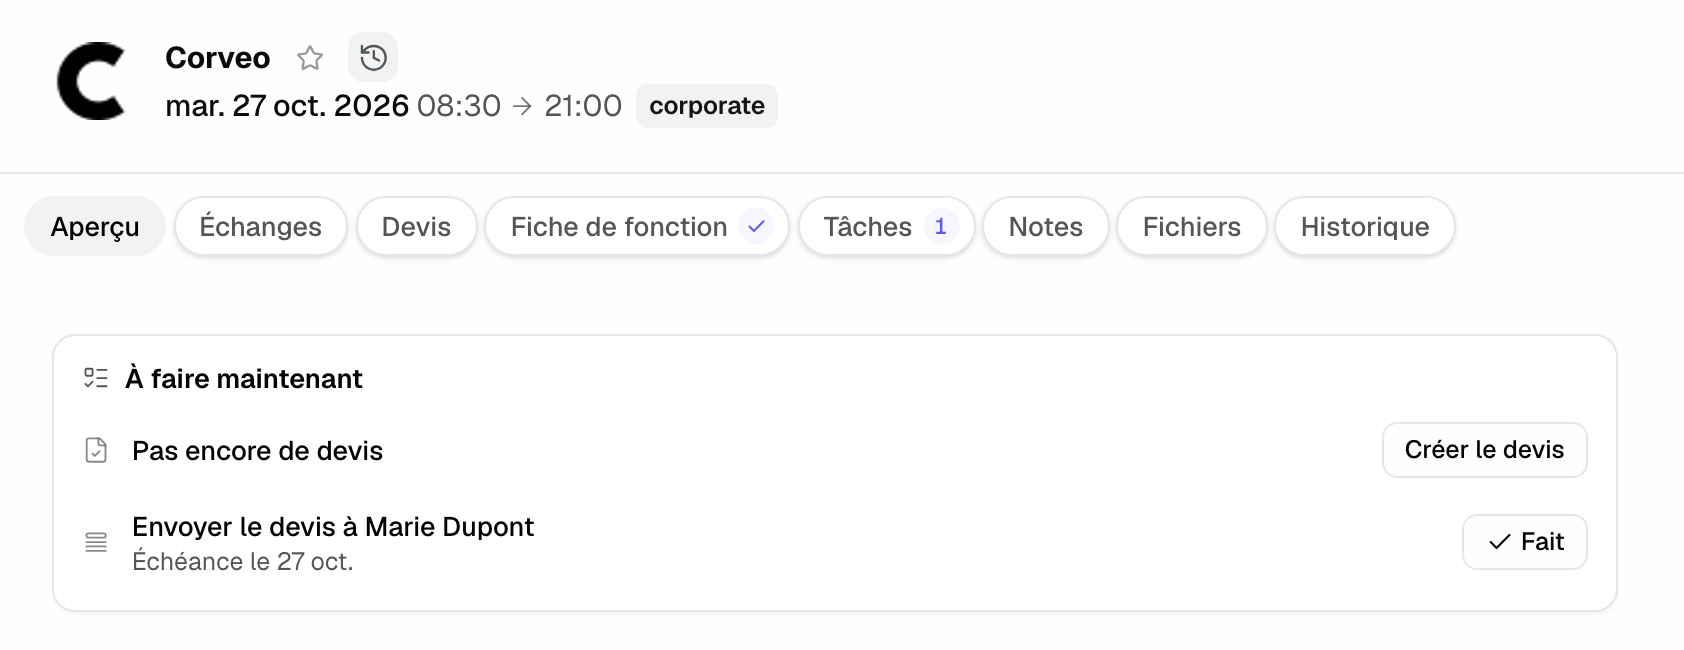
The "To do now" block
At the top of the Overview, this block says what to do next. It only appears when there is something to do, and holds at most three rows:
- A client message waiting for an answer, for example "Marie Dupont is waiting for an answer": "Reply" opens the thread in "Conversations".
- The step of the most advanced quote: "No quote yet" with "Create the quote", "Quote not sent yet" with "Send", or "Quote sent, not signed yet" with "Follow up". Nothing once a quote is accepted or signed, nor for a platform quote.
- Your next open task, with its due date: "Done" checks it off. A task assigned to a teammate only shows for them; an unassigned task shows for the whole team.
Under this block, "Highlights" sums up the status, the budget or confirmed revenue, the number of guests and the owner. The Overview then lists the latest quotes, tasks, notes and history, each with "See all".
5. Use the details column
The right column groups the file's properties into collapsible blocks: "Properties", "Room schedule" (when the venue offers slots), "Linked events" (when the event has some), "Details", "Client", and "Accommodation" when a hotel system (PMS) is connected to the venue.
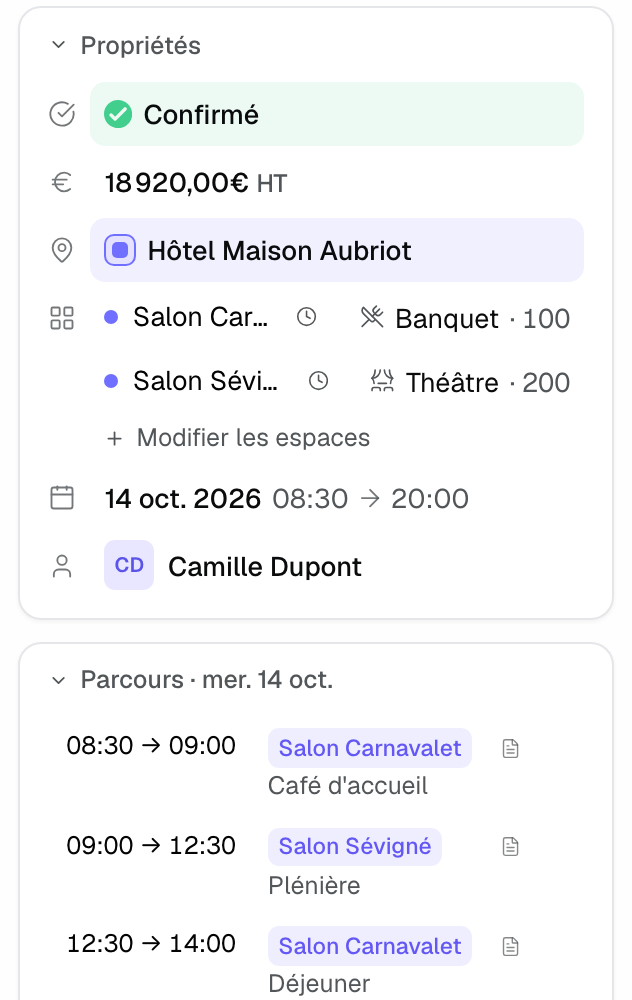
- "Properties": status, confirmed revenue (confirmed event), venue, spaces with their layout and seats, dates and hours, owner. In a workspace with a single venue, the venue row is hidden, unless the event has no venue yet.
- "Details": type, budget, number of guests, source, external link, technical and service needs, schedule.
- "Client": company, contact, email, phone, tags and "Bill to". For a private client (no company), the person comes before the company.
The column can be resized: drag its left edge, or use the arrow keys on the handle. Double-clicking the handle returns to the automatic width. The width you pick applies to every record page (event, person, company) and is remembered. Below 1,100 px wide, the column folds and opens over the page, with the "Client" block first.
6. Change the status and the stage
The status says where the opportunity stands:
- "Hold": the date is held on a provisional basis, nothing is signed.
- "Confirmed": the booking is firm. On the calendar, the block turns from dotted to solid.
- "Lost": the opportunity didn't go through.
- "Canceled": the event had been confirmed, then canceled, sometimes with fees.
Click the status in "Properties". A single menu, with a search box, lists the four statuses and, under "Hold" and "Confirmed", your workspace's stages: one click changes the status and sets the stage at the same time. On phones and tablets, where the column is folded, the same "Status › Stage" pill sits in the header, under the event name. See Track progress with event stages.
When you move to "Lost" or "Canceled", a "Reason" row appears in "Properties" to note the optional reason; a canceled event also shows its cancellation fee. When you move to "Confirmed" and other holds of the same request exist at other venues, the "Confirm this event" window offers to mark them lost ("Confirm & mark as lost").
7. Book rooms by slot
In a venue with at least two spaces that isn't always booked as a whole, the "Room schedule" block books a room for one day, "All day" or for set hours. With no slot, each space of the event is booked for all its dates.
- "Add a slot": pick the space, the day, then "All day" or a start and an end. The label and the number of guests are optional.
- A slot booked from a quote carries a document icon and can also be edited from the quote line.
- Slots follow the event's days when you move them. A slot left outside the dates is flagged: "Move" places it on the nearest day, "Remove" deletes it.
- Each booked room shows its layout (Theatre, Banquet…) and its seats. A warning appears when guests exceed the capacity.
Slot and room layout rules are detailed in Create your spaces.
Example: a three-day residential seminar
A hotel receives a seminar inquiry for 60 people: arrival Thursday afternoon, gala dinner on Friday, end on Saturday at noon. The sales manager converts the inquiry, selects the three days and turns on "Different hours each day": 14:00 → 23:00 on Thursday and Friday, 08:30 → 12:30 on Saturday.
On the event page, "To do now" shows "No quote yet". She creates the quote, sends it, and the row becomes "Quote sent, not signed yet" with "Follow up". Once it's signed, she moves the event to "Confirmed" from the status menu; the calendar and the BEO use each day's hours.
Troubleshooting
"Different hours each day" doesn't appear
Cause: only one day is selected. Solution: select at least two days; the switch appears under the hours.
Hours per day can't be saved
Cause: a day has no start or end, the start and end are identical, or an overnight end goes past 06:00. Solution: follow the message under the hours. For a later end, add the next day.
The status can't be changed
Cause: your role is "Operations" or "Read-only", or the event is archived. Solution: ask a member to change the status, or unarchive the event from the ⋮ menu.
The venue row is gone from the details column
Cause: your workspace has a single venue, so the row is hidden because it adds nothing. Solution: nothing to do. The row comes back for an event without a venue, or as soon as a second venue exists.
"To do now" doesn't show a task
Cause: the task is assigned to a teammate, done, or another task is due sooner. Solution: open the "Tasks" tab to see all the tasks of the file.
Frequently asked questions
Do I need to fill in everything at creation?
No. A client name (company, first name or last name), a venue and dates are enough. The "Hold" status and the owner are prefilled. Add the spaces, the number of guests and the budget as soon as you know them.
Can I change the hours per day after creation?
Yes. Click the dates in the details column: the same picker opens, with "Different hours each day".
What is the difference between "Lost" and "Canceled"?
"Lost" is an opportunity that was never signed. "Canceled" is an event that was confirmed and then dropped, sometimes with cancellation fees.
How do I move an event by one day?
In the date picker, click the new day, then click the old one to remove it, and save. Room slots follow the days. You can also drag the event on the calendar.
See also
Testen Sie es 30 Tage lang mit Ihren nächsten Anfragen, ohne Kreditkarte.