Connect your business email (contact@, info@…)
Link the address your clients use (contact@, info@…), through a direct connection or forwarding: every inquiry lands in your Inquiries.
Updated
Your business address (contact@, info@, events@…) is usually the one your clients know: it is where wedding, corporate and private-hire inquiries land. Joinways can read every email received at that address, detect inquiries automatically and centralize them in your Inquiries, next to your quotes, contacts and calendar.
Two methods exist. The direct connection links the mailbox that receives the inquiries, in one click, when it is hosted by Google or Microsoft. Forwarding covers everything else (group, distribution list, other provider): Joinways gives you a dedicated receiving address and you create a forwarding rule, without sharing any credentials. This guide covers both, the live verification and the usual blockers.
Prerequisites
- Your business email address (contact@, info@, events@…) and access to its mailbox, to sign in to it or create a forwarding rule.
- Rights on the mailbox: if the address is managed by your organization (Google Workspace, Microsoft 365), you need to be able to change forwarding, or ask your administrator.
- An owner or admin role in the Joinways workspace: other members only see the Personal tab of Integrations.
What you will learn
- Create the Joinways receiving address linked to your business email.
- Connect a mailbox hosted by Google or Microsoft directly.
- Set up the forwarding rule in Gmail, Google Workspace, Outlook or another provider.
- Verify forwarding with a live test email.
- Resume a setup you left unfinished, and remove an address.
Connect your address, step by step
The whole thing takes about two minutes. The assistant guides you screen by screen, and verification is automatic.
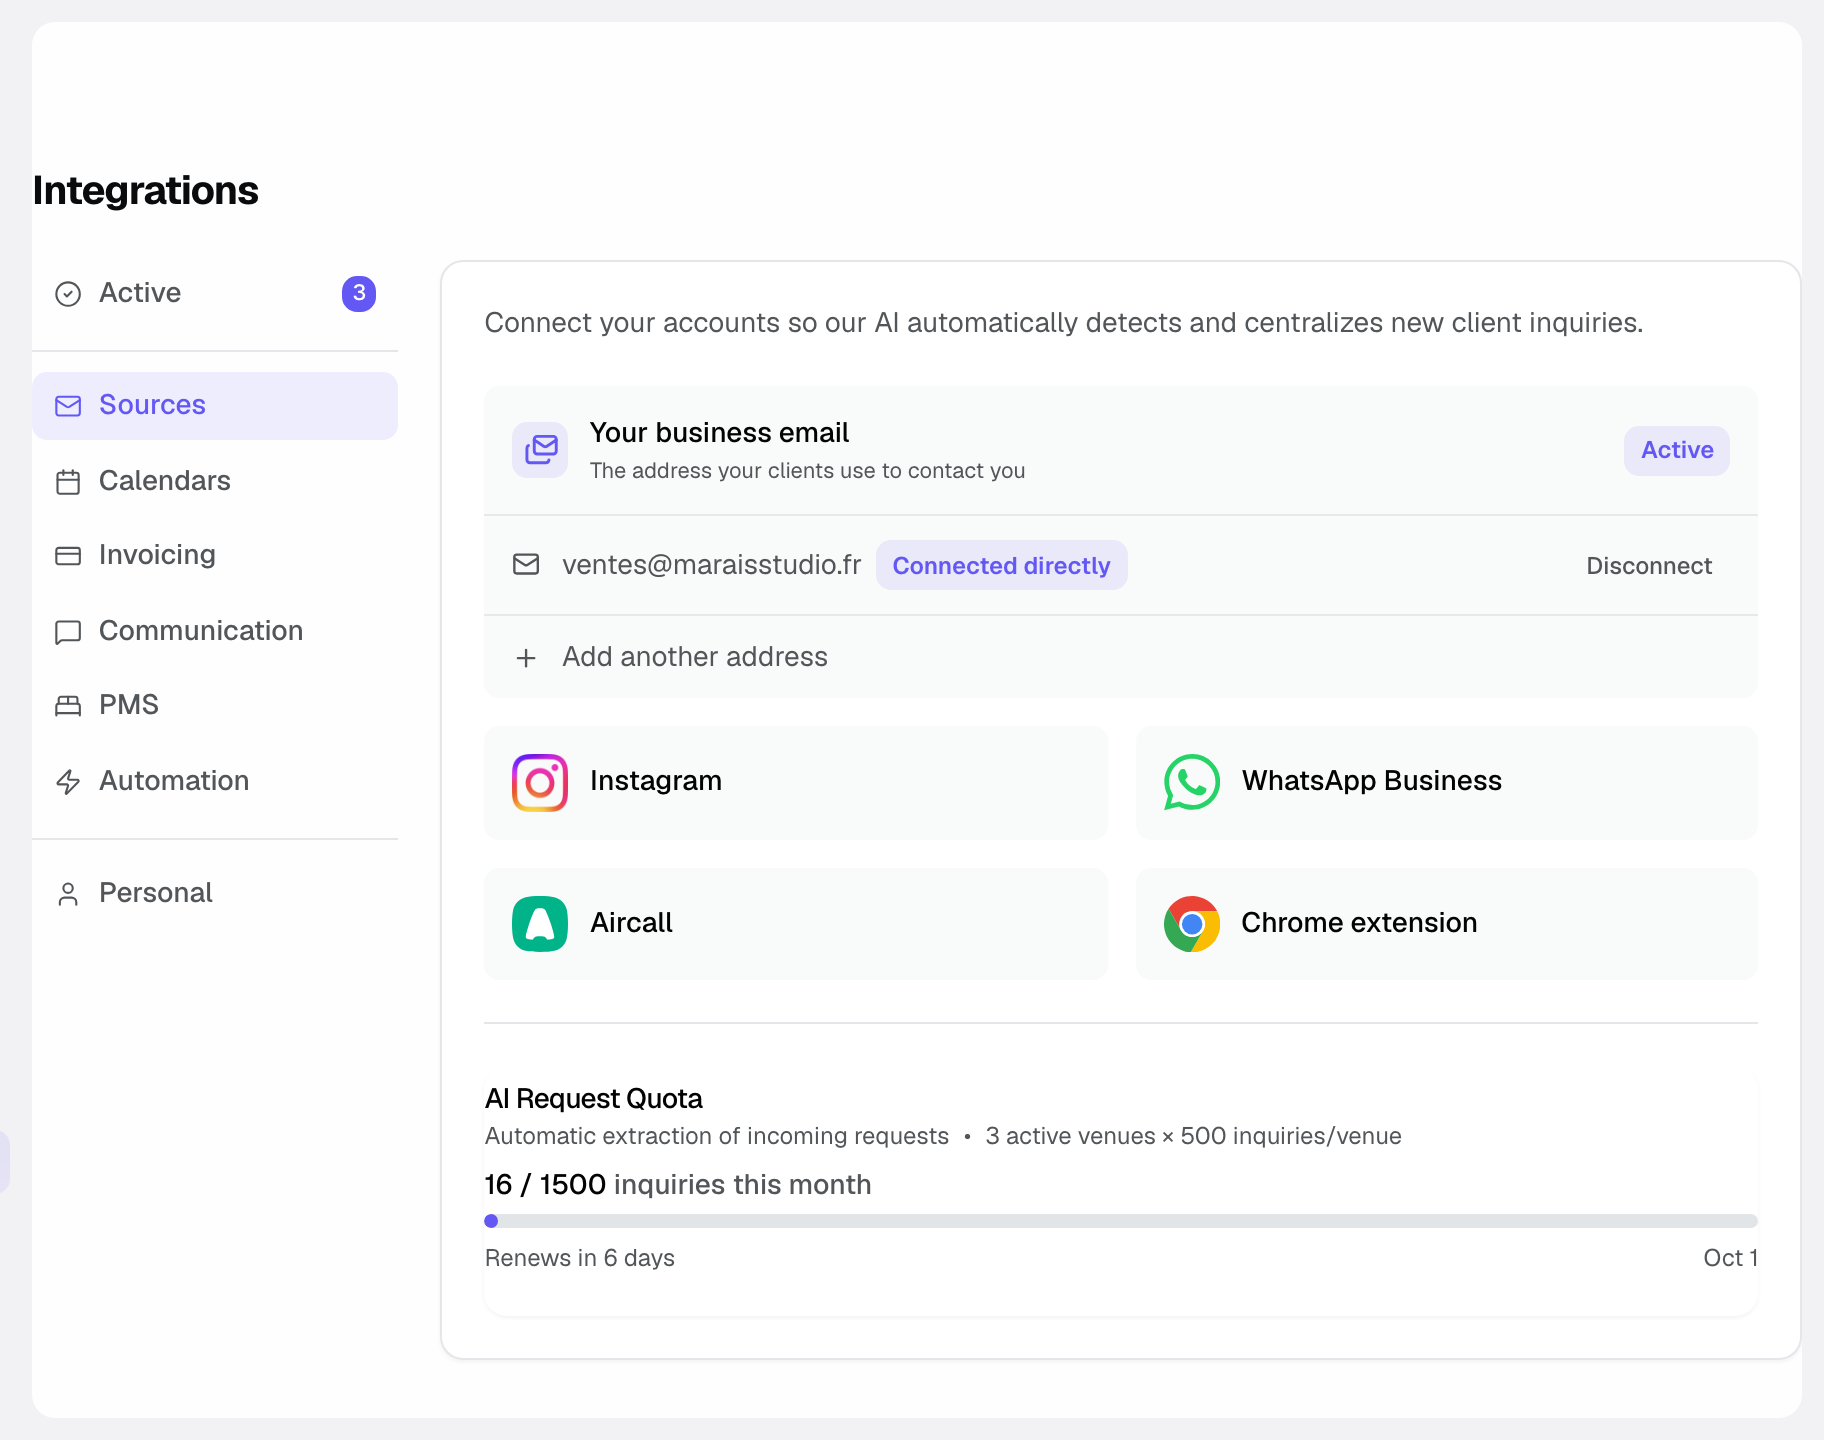
- Go to Settings then Integrations, Sources tab, and click Your business email (or Add another address if an address is already linked).
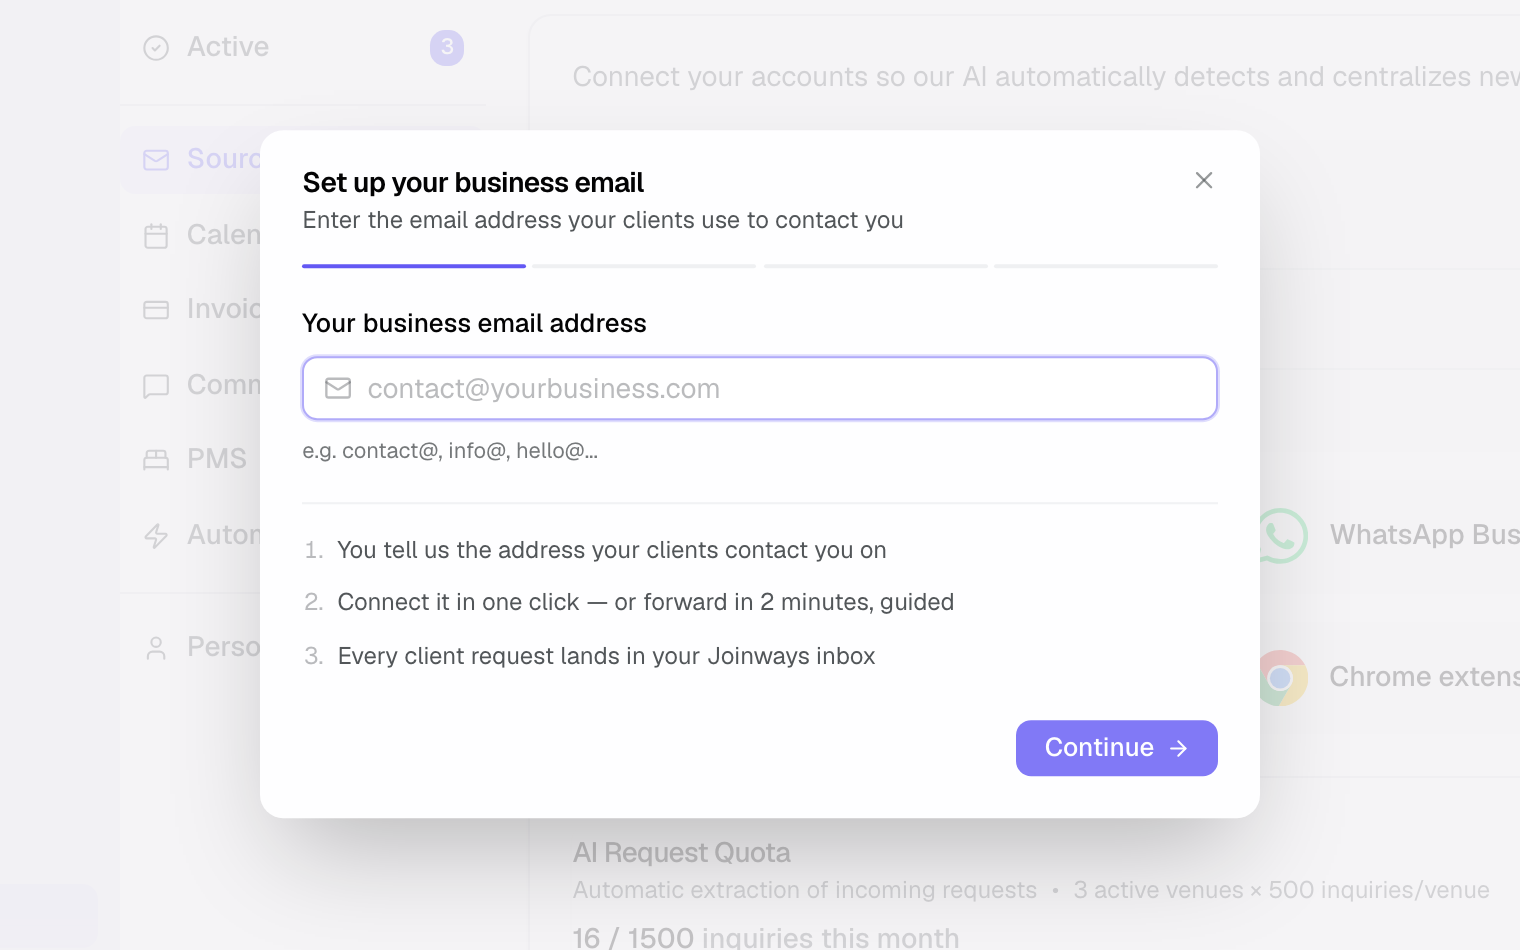
- Enter the address your clients use to contact you, then click Continue. If it is hosted by Google or Microsoft, Joinways offers two methods: Connect Gmail directly (or Outlook, marked Recommended) and Set up email forwarding. For other providers, the assistant goes straight to forwarding and creates your receiving address, of the form inbound-…@in.joinways.app.
- Copy the receiving address, then follow the instructions in the tab matching your provider: Gmail, Workspace, Outlook or Other (OVH, IONOS…). Each tab lists the exact steps, with a direct link to the right settings screen.
- Once the rule is saved in your mailbox, click Test the forwarding. Joinways sends a test email to your business address and checks that it comes back: the screen turns green as soon as the test arrives, usually in under a minute.
Direct connection
With Connect Gmail directly or Connect Outlook directly, you sign in to the mailbox that receives the inquiries, in the Google or Microsoft window. No rule to create, no test: the address appears with the Connected directly badge and Joinways picks up the inquiries of the last 90 days (50 at most). For a Microsoft 365 shared mailbox, sign in with your own account that has access to it. A Google group or a distribution list has no mailbox to connect: choose forwarding.
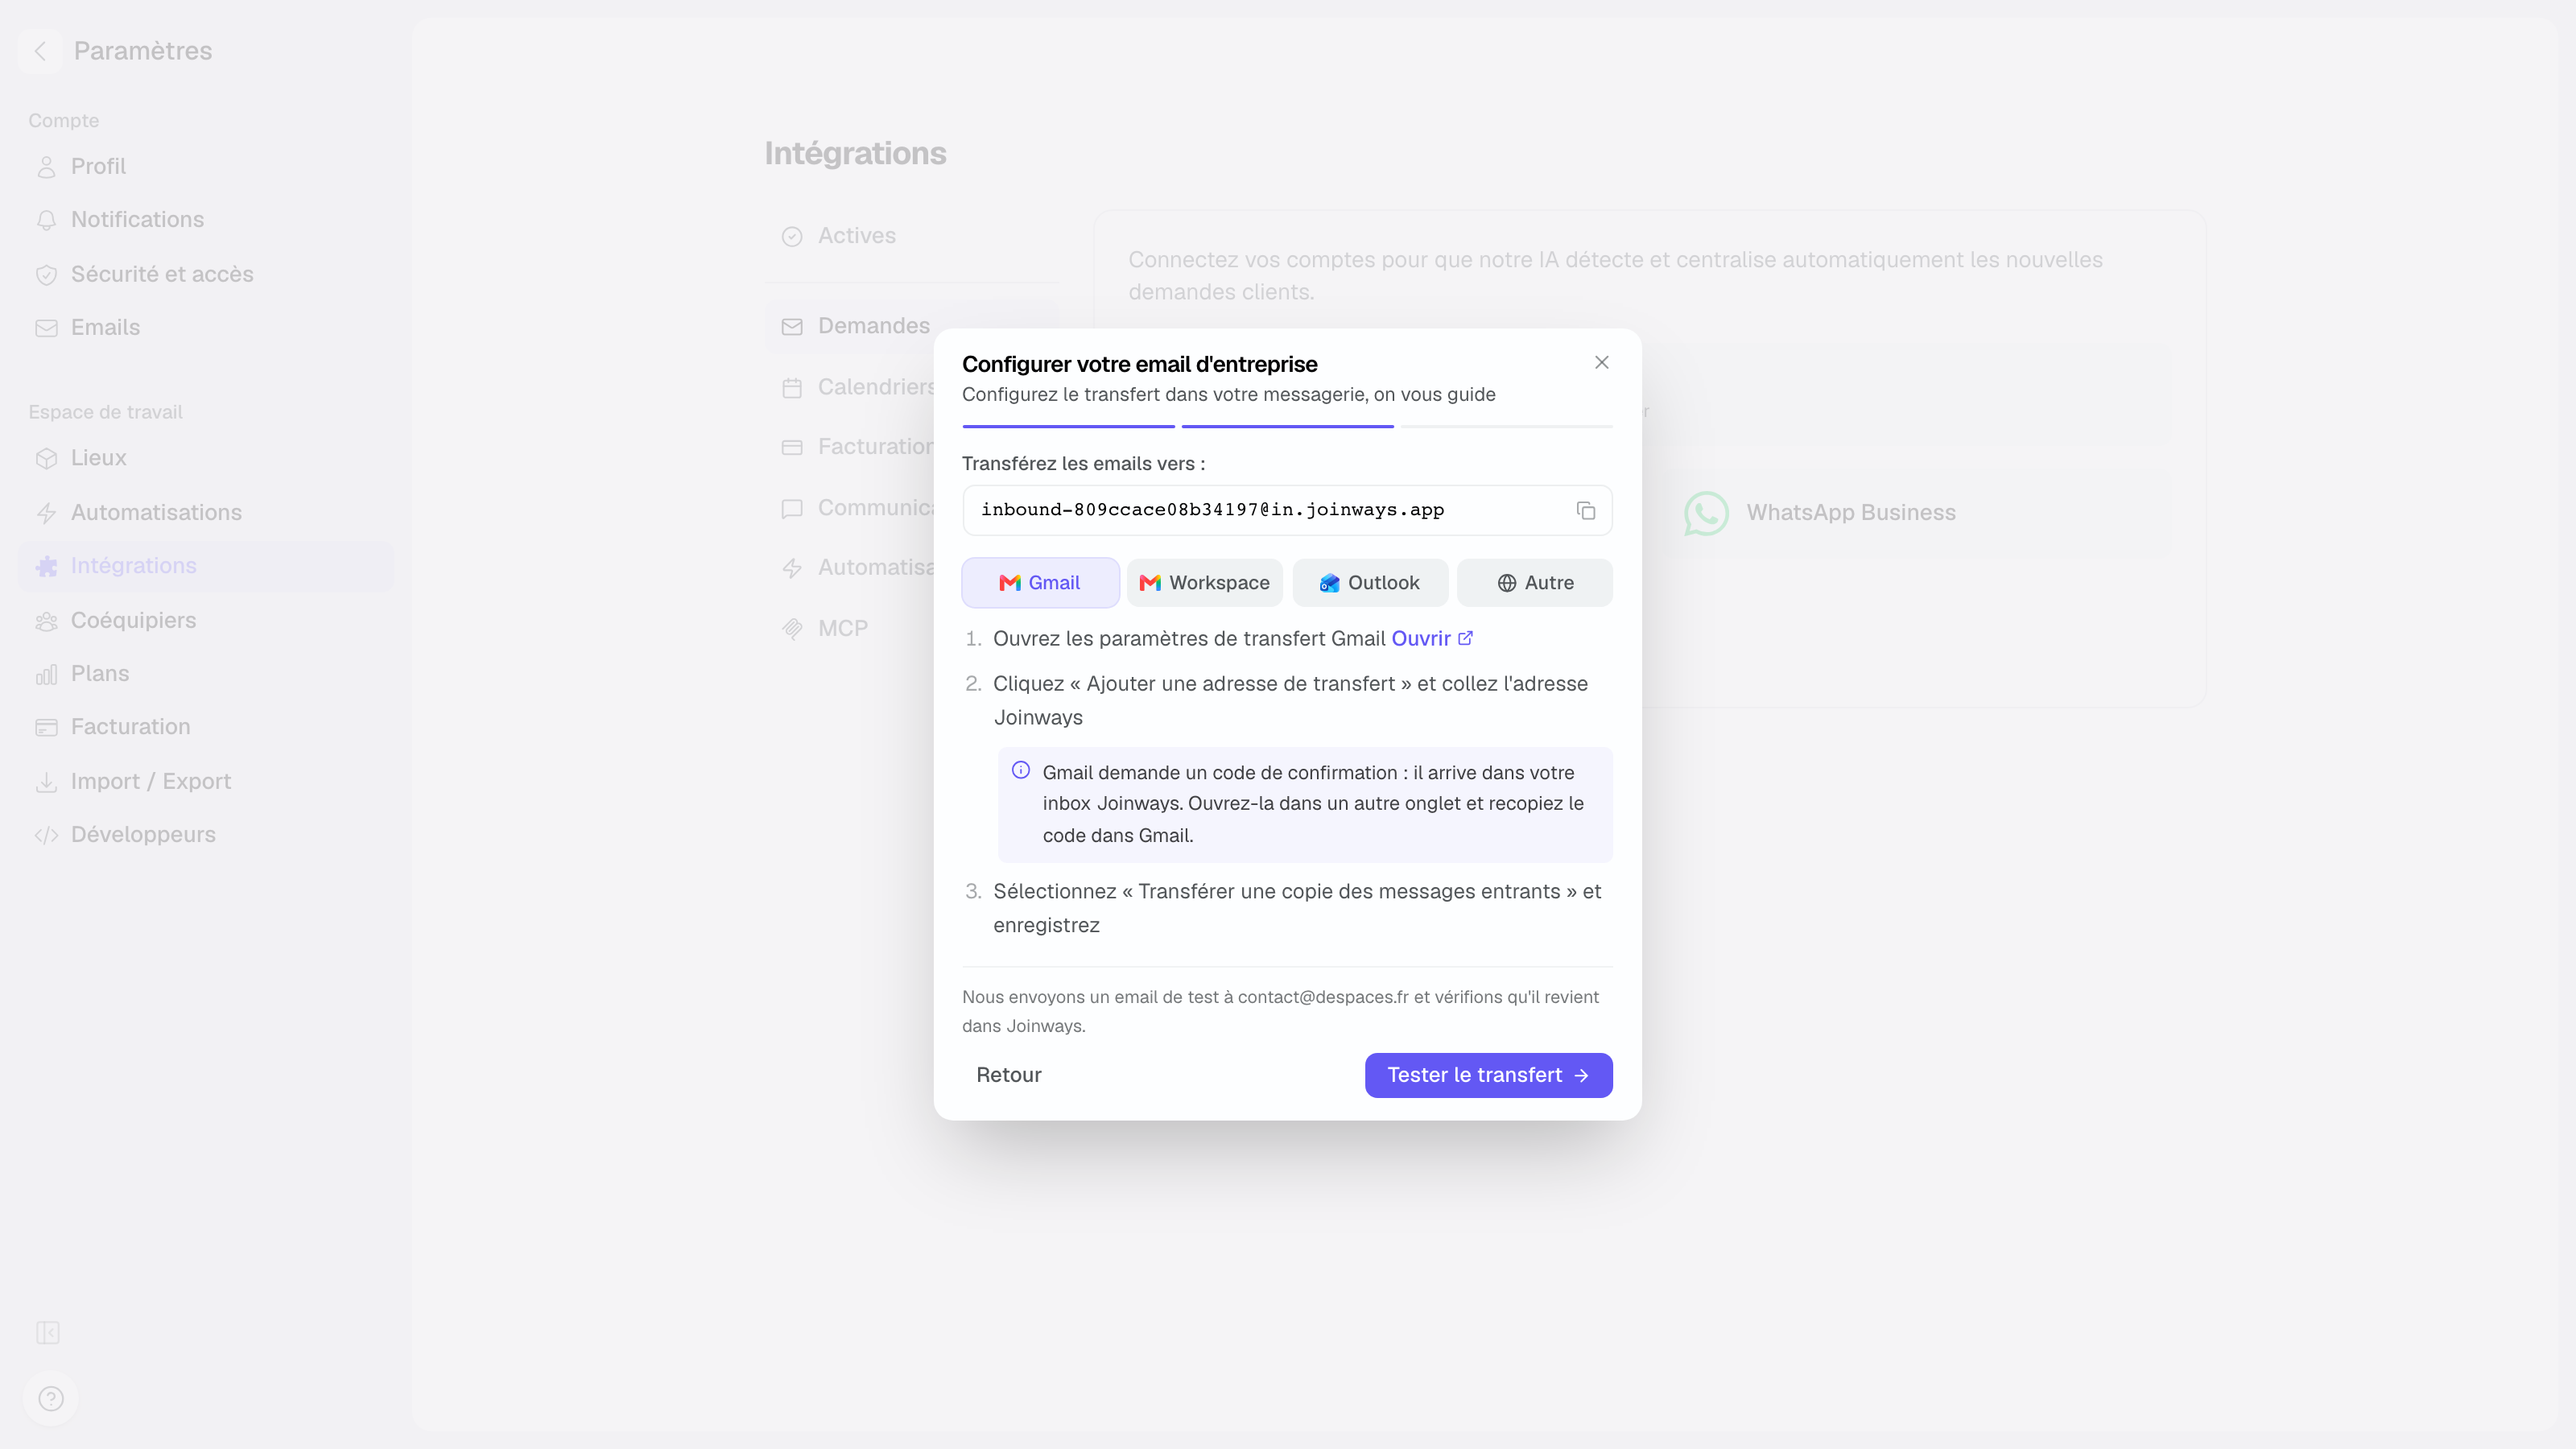
Confirming Gmail forwarding
When you add the Joinways address as a forwarding address, Gmail shows a “confirmation code” field: ignore it. Joinways receives Google's email for you and, a few seconds later, the assistant shows “One last click to activate forwarding” with the Approve the forwarding button. Click it, reload the Gmail settings, select “Forward a copy of incoming mail” and save. Until that click, the address shows 1 click left to approve.
Reference: what forwarding does
- Every email sent to your business address is forwarded as a copy to Joinways; the original stays in your mailbox, nothing is moved or deleted.
- Detected inquiries surface in your Inquiries and attach to the right contact.
- You can connect several addresses (contact@, events@…) with Add another address; each one gets its own receiving address and its own verification.
- No credentials are shared: forwarding is configured on the mailbox side, and disabled the same way.
Resume an unfinished setup
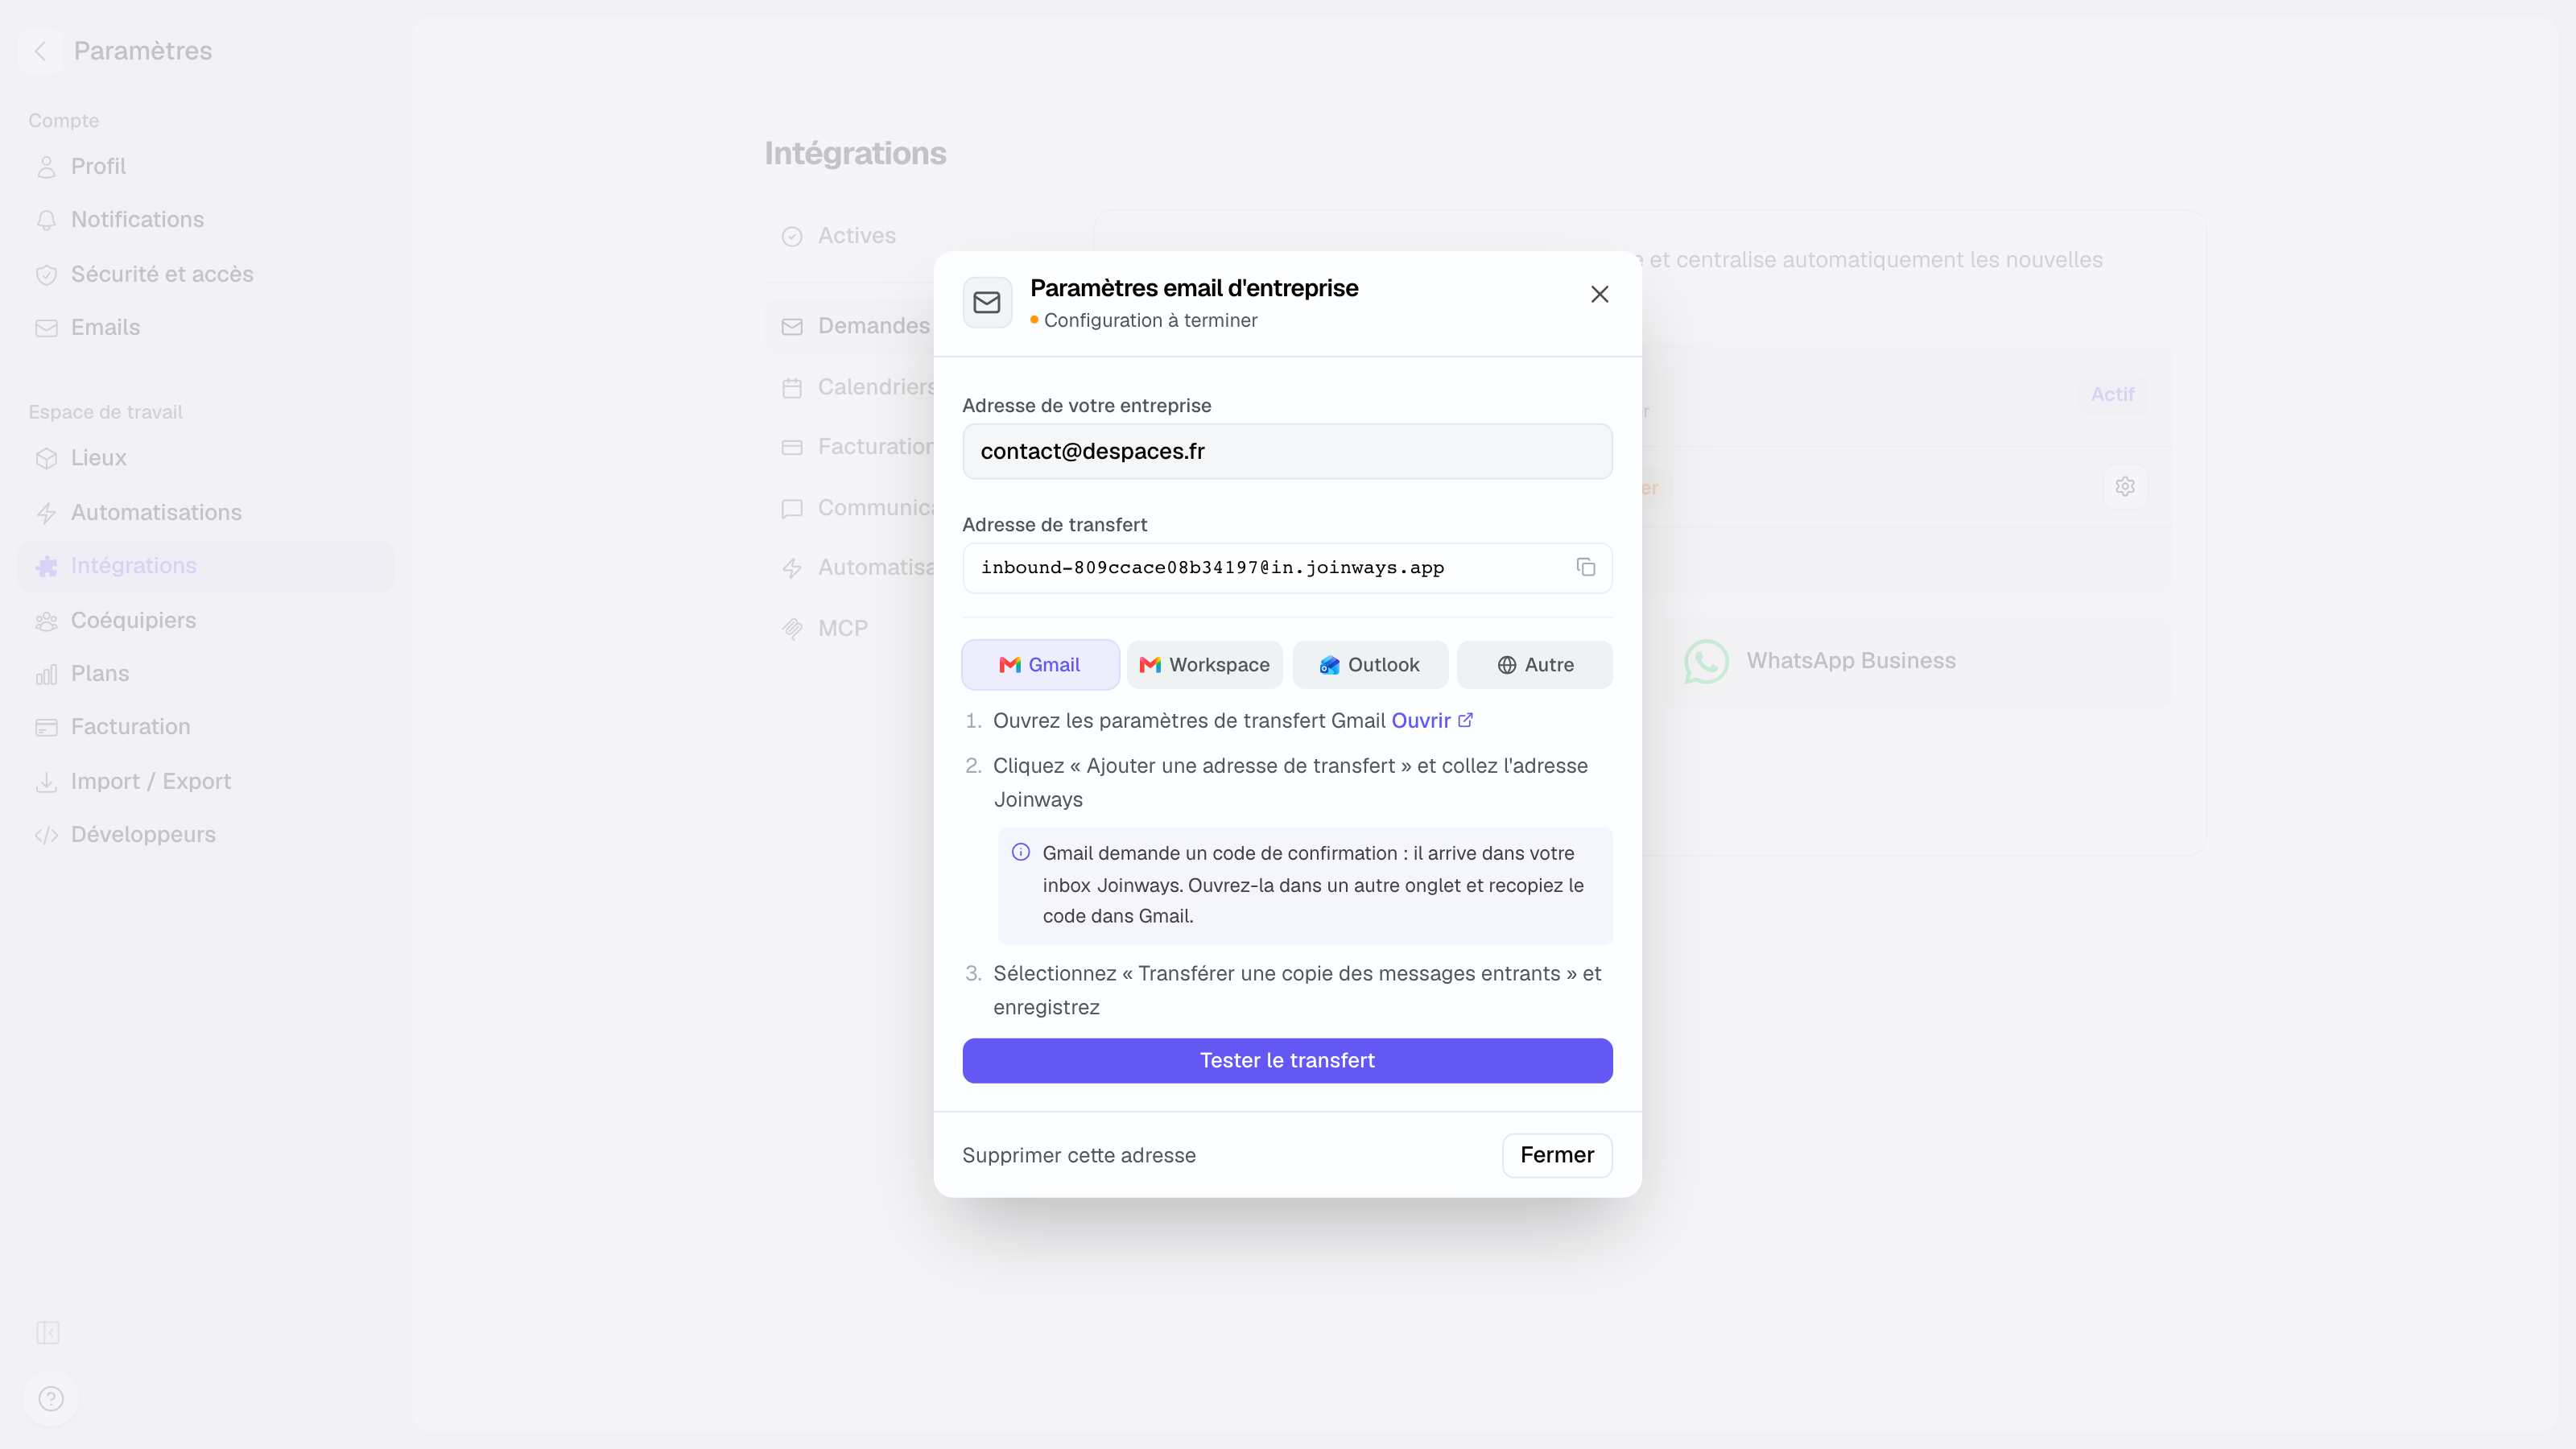
If you close the assistant before the end, the address stays listed with the Setup to finish badge. Click it to reopen the instructions exactly where you left off, then send a test once the rule is in place.
Special cases
- Google Workspace: besides per-user forwarding (Gmail interface), an administrator can create a global routing rule in the Admin console; the Workspace tab of the assistant covers that path.
- Outlook: the assistant links to Microsoft 365 mail rules for a business address, or to Outlook.com for a personal one (hotmail, live…).
- Outlook and Microsoft 365: Set up automatically with Microsoft creates the forwarding rule for you, after you sign in to the address's Microsoft account. If the organization blocks external forwarding, the address shows Blocked by your organization: an administrator must allow it in Microsoft Defender (outbound anti-spam policy), then you send another test.
- Other providers (OVH, IONOS…): look for “Forwarding” or “Redirect” in the settings. If your provider asks to confirm the destination, the confirmation email arrives in your Joinways inbox: open it and click the link.
Good to know: the Verified badge appears as soon as one forwarded email has arrived. While the address shows Setup to finish, inquiries sent to it do not reach Joinways yet.
Best practices
- Start with the address that receives the most inquiries (contact@ or events@), then add the others.
- Send the test once the rule is saved: verification waits up to two minutes, then offers to send another test.
- Also connect your personal mailbox (Settings then My mailbox) to send replies from your own address.
Troubleshooting
The test never arrives
Problem: after “Test the forwarding”, the screen keeps waiting and then reports the test was not received.
Cause: the forwarding rule is not active in your mailbox, or the Gmail forwarding was not approved (Approve the forwarding button).
Solution: check in your mailbox that the Joinways address is confirmed and the rule enabled, then click Send another test.
Gmail asks for a code I cannot find
Problem: Gmail expects a confirmation code and nothing arrives in your Gmail mailbox.
Cause: the code is sent to the Joinways receiving address, not to your mailbox.
Solution: ignore the code field in Gmail. Go back to the Joinways assistant: the Approve the forwarding button appears a few seconds after Google's request. If you closed the assistant, click the address marked 1 click left to approve.
The address stays on “Setup to finish”
Problem: the badge never switches to Verified.
Cause: Joinways has not received any forwarded email yet.
Solution: reopen the address to review the instructions, finish the rule in your mailbox, then test again.
Concrete example
Le Loft du Canal receives its inquiries at contact@leloftducanal.fr, a Google group. The manager opens Settings then Integrations, Sources tab, clicks Your business email, enters the address and chooses Set up email forwarding. She adds the Joinways address as a member of the group, then clicks Test the forwarding. Thirty seconds later the screen turns green: every inquiry sent to contact@ now lands in her Inquiries.
FAQ
Are my emails moved out of my mailbox?
No. Forwarding sends a copy to Joinways; the originals stay untouched in your mailbox.
Do I need to share my password or connect my mailbox?
No password is ever asked for. With forwarding, nothing is connected: the rule is created on the mailbox side and can be deleted at any time. With the direct connection, you authorize Joinways in the Google or Microsoft window and can disconnect it from the card.
Can I connect several addresses?
Yes. Click Add another address and repeat the setup; each address gets its own receiving address and its own verification.
What happens if I remove the address in Joinways?
Forwarded emails are no longer processed. Remember to also disable the forwarding rule in your mailbox.
How is this different from connecting Gmail or Outlook?
The Your business email card (Sources tab) brings inquiries into Inquiries, through a direct connection or forwarding. The Personal tab connection links your own inbox: your conversations are filed on events and you reply from your address. It does not create inquiries.
See also
Try it on your next inquiries for 30 days, no credit card.