Understanding unified Inquiries
Centralize email, Instagram and WhatsApp in one place, let AI qualify each inquiry, and never miss an opportunity again.
Updated
Inquiries is the entry point of your entire sales activity: it's the screen where every message that could become an event lands, no matter which channel the prospect used to reach you. Instead of watching your email on one side, your Instagram DMs on another and WhatsApp somewhere else, you look at a single stream that the AI has already sorted and pre-qualified.
The core idea is a single funnel. An opportunity is never as easy to lose as when it is scattered across several apps, where no one knows who is supposed to answer. By gathering every channel in one place, Inquiries makes sure no inquiry goes unanswered simply because it arrived on a channel you rarely check.
What you'll learn
- Understand how inquiries arrive from every channel and get qualified automatically
- Read and interpret the details extracted by the AI
- Filter the stream and prioritize the most promising inquiries
- Process an inquiry: convert it, reply to it or reject it
The principle: a single funnel
Every prospect picks their own channel: some send a detailed email, others a two-line Instagram message, others a voice note turned into text on WhatsApp. Without a central tool, those messages live in separate mailboxes and end up contradicting one another or getting lost. The unified Inquiries view gathers them into a single queue, sorted by arrival date, where each entry shows which channel it came from.
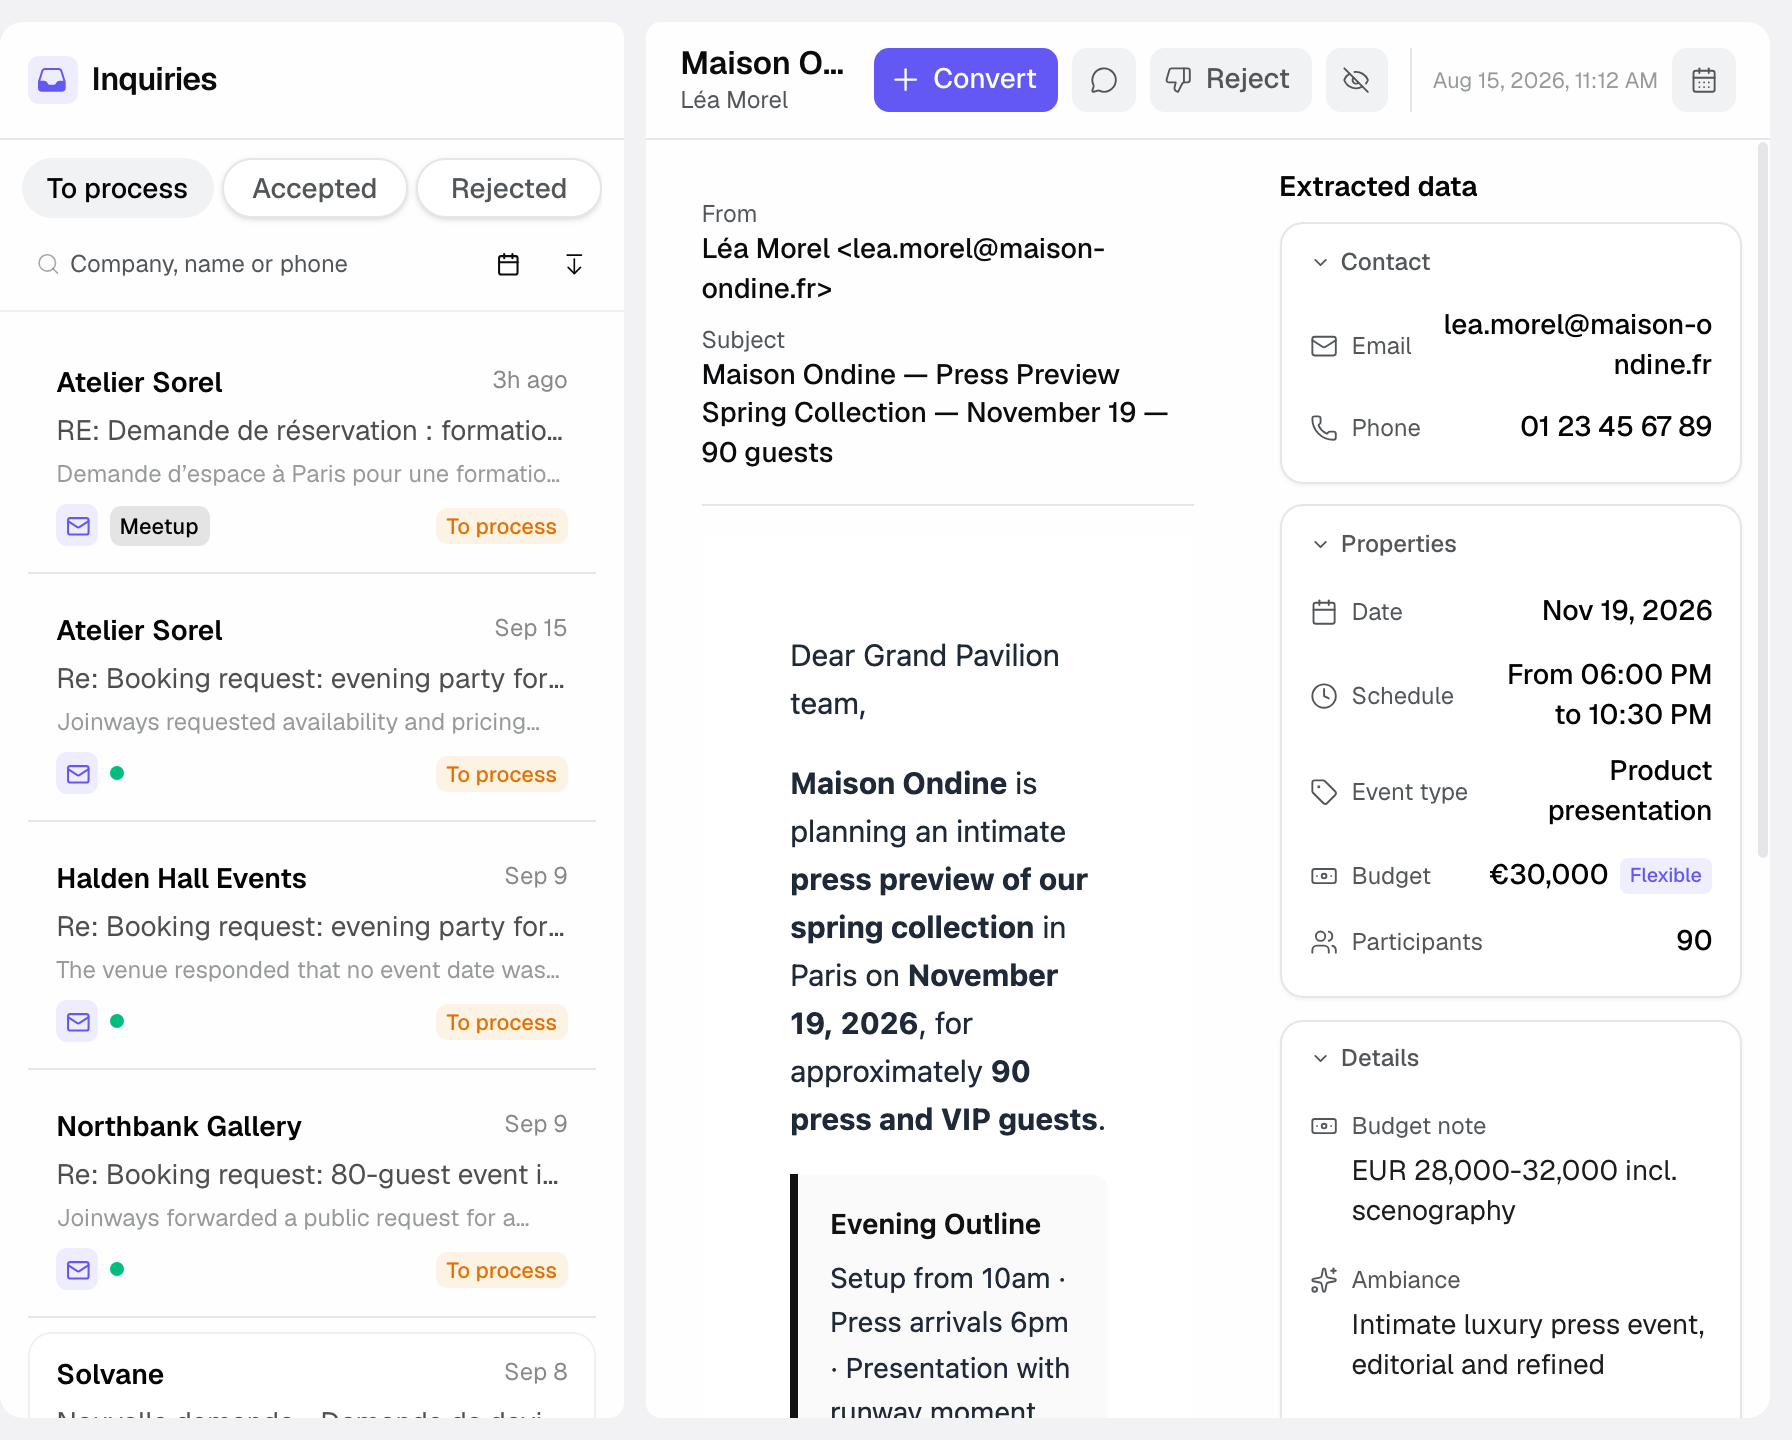
In practice, you see the raw message on the left and, on the right, what the AI understood from it. You no longer copy a date from an email into another tool: the information is already structured, ready to become a file.
The centralized channels
Several channels feed Inquiries. Each is connected once in « Settings » > « Integrations », « Sources » tab, then brings in its new messages automatically. On top of the channels below, Aircall covers calls and the « Chrome extension » completes booking-platform inquiries.
- Your business email (Gmail, Outlook, Microsoft 365, or automatic forwarding): most inquiries, including those from booking platforms. It's often the most complete channel, as prospects take the time to write the date, budget and attendee count.
- Instagram: direct messages from your business account. Inquiries here are shorter and more informal, but often high-potential.
- WhatsApp Business: incoming conversations. Handy for quick exchanges, especially on last-minute requests.
- Lead form: each venue's own form, set up in the venue's « Lead form » tab. Since the fields are already structured, extraction is most reliable there.
Whatever the channel, the inquiry lands in the same place and follows the same path. For an inquiry received by email, you reply straight from Inquiries with the « Reply » button. For Instagram and WhatsApp, « See conversation » or « Open conversation » opens the exchange in the original app. For a platform inquiry, « Open on the platform » takes you where the client is waiting for your reply.
What the AI does for you
For every incoming message, the AI does a first round of sorting to save you time. It starts by detecting whether this is really an event inquiry or an unrelated message (newsletter, cold outreach, an admin question). If it is an inquiry, it extracts the key details:
- Event type and desired date(s): enough to check availability right away.
- Attendees (Pax) and budget mentioned: the two criteria that determine the right space and how serious the project is.
- Contact details (name, email, phone), so the inquiry links to the right person.
Behind the scenes, the AI also assesses each inquiry's quality. That assessment is used to surface the strongest opportunities and, depending on your settings, to trigger quote generation without any manual step.
What you see on screen is therefore a faithful summary placed next to the original text. You always keep the ability to double-check everything: the AI proposes, you decide.
Reference: channels, statuses and filters
To find your bearings in the queue, here's a recap of the elements you encounter on every inquiry.
An inquiry's statuses
- « To process »: the inquiry is waiting for a decision; it's the queue to clear first every day.
- « Sent »: you replied from Joinways; the inquiry stays in the « To process » tab, and the « Reply received » badge appears when the client answers.
- « Validated »: the inquiry was converted into an event; it moves to the « Accepted » tab and « View event » opens the file.
- « Declined »: the inquiry was rejected without creating a file; it stays in the « Rejected » tab, from which « Restore » puts it back in the queue.
Filtering the queue
- By tab: « To process », « Accepted » (converted inquiries) or « Rejected ».
- By « Source » (email, Instagram, WhatsApp, call…) and by « Platforms », by reception period (« Date range »), or by searching for a company, name or phone.
Each inquiry also shows its source channel and arrival date, two cues that help you decide what to handle first.
On the free plan, a counter shows how many inquiries you've received this month. Beyond the quota, new inquiries arrive with the « Locked » badge: they are captured, but their content stays blurred until you move to Pro (« Upgrade to unlock » button).
Filter and prioritize the stream
When volume rises, sorting becomes essential. Tabs separate inquiries to process, accepted and rejected; filters narrow the list by source, platform or reception date. The list stays ordered by arrival date, newest first: no filter sorts by event date.
- Open Inquiries: the queue shows the most recent inquiries at the top, with their status and channel.
- Apply a filter to isolate what matters now, for example the Instagram source or inquiries received this week.
- Process inquiries one by one: a converted or rejected inquiry leaves the « To process » tab; after a reply, it stays there with the « Sent » status.
Process an inquiry
Processing an inquiry means deciding its fate once the extraction is verified. Three actions are available, and each moves the file forward cleanly.
- Open the inquiry to see the original message and the extracted fields side by side.
- Correct if needed (date, budget, attendee count) in the form that opens with « Convert »: the inquiry's « Extracted data » panel is read-only.
- Choose the action: « Convert » opens the pre-filled form and creates a « Hold » event; « Reply » writes to the client without leaving the inquiry (email inquiries); « Reject » removes it from the queue, with or without an email to the contact. If the same inquiry already exists at the same venue, the « Same request » block offers « Merge into this one ».
How it works
The sequence is always the same: a message arrives on a connected channel, the AI detects and extracts it, the inquiry appears in Inquiries with its summary, you verify and then decide. What you correct in the conversion form is saved on the event; the inquiry keeps the AI's original reading.
Edge cases
Several messages from the same prospect: when the same inquiry comes back at the same venue, the « Same request » block flags it and offers « Merge into this one ». At conversion, Joinways reuses the existing contact with the same email or phone. To link a stray email to an event that's already open, open the event, « Conversations » tab, then « Link an email ».
Ambiguous message: if the AI hesitates and only partially extracts the fields, don't force the conversion. Reply to the prospect first to get the missing date or budget, then process the completed inquiry.
Well-written off-topic message: a sales pitch can look like an inquiry. Before converting, check that a real event date is mentioned; otherwise, dismiss it.
Volume spike: after a trade show or a campaign, Inquiries can fill up at once. Go through them checking the event date shown in each inquiry's detail, and handle the nearest ones first.
A channel disconnected mid-stream: inquiries already received stay in the queue. If your booking email is no longer connected, a banner says so in Inquiries with a « Reconnect it » button. Check the « Sources » tab as soon as a channel seems silent.
Good to know: an extraction error is fixed in the conversion form, before confirming. The value you confirm is the one saved on the event.
Best practices
- Process Inquiries at least once a day: response speed wins deals, because the first venue to reply often wins.
- Prioritize the most complete and urgent inquiries (near date, clear budget) rather than working strictly in arrival order.
- Convert genuine inquiries without delay: at conversion, Joinways creates the contact or reuses the one with the same email or phone, so the history stays in one place even when the prospect switches channel.
- Check the extracted data before each conversion: an error fixed at the source doesn't spread all the way to the quote.
- Keep every channel connected: a disconnected channel is a source of inquiries that no longer flows into the queue.
- For inquiries received by email, reply from Inquiries rather than from your mail app: the history stays complete and centralized.
Troubleshooting
A genuine inquiry wasn't detected? Cause: the AI classified it as a miscellaneous message because the wording was unusual. Solution: create the event directly from « Events », using the details in the message.
An inquiry isn't showing up in Inquiries at all? Likely cause: the channel in question is not (or no longer) connected. Solution: check the channel's connection in your settings and reconnect it if needed.
An extracted field is consistently wrong? Cause: a recurring confusion, for example a tax-inclusive budget read as tax-exclusive. Solution: check that field first and fix it in the conversion form before confirming.
The queue isn't updating? Cause: an active filter is hiding part of the inquiries. Solution: reset the filters to see the whole queue before concluding there's a channel problem.
Real-world example
Monday morning, 12 inquiries are waiting in the « To process » tab, arriving by email, Instagram and WhatsApp. Instead of opening each app separately, the team works through a single queue. In 20 minutes, it converts 6 inquiries into holds, merges a duplicate flagged by the « Same request » block (the prospect had followed up), replies to the 3 inquiries that were missing a date and rejects 2 disguised sales pitches. The 3 inquiries awaiting an answer stay in the queue with the « Sent » status.
Another example
One Friday evening, a WhatsApp inquiry arrives: "Hi, available tomorrow evening for 30 people?". The AI detects an inquiry, extracts 30 attendees and a date for the next day, but the budget and event type stay empty. The planner sees it at the top of the queue, clicks « Open conversation » to reply in WhatsApp and get the event type, then comes back to Inquiries and converts it into a hold. The inquiry and the event keep the link to the original conversation.
FAQ
Do personal messages come through too?
The AI filters to surface only what looks like an event inquiry; you keep final control and can always dismiss anything that doesn't belong.
Should I reply from Inquiries or from the original channel?
From Inquiries for an email inquiry: the exchange stays centralized. For Instagram and WhatsApp, you reply in the original app (« See conversation »), and for a platform, on the platform.
What happens if I correct a field extracted by the AI?
The correction happens in the conversion form: it is saved on the event created. The inquiry's « Extracted data » panel keeps the AI's original reading.
Is a rejected inquiry lost?
No: « Reject » moves the inquiry to the « Rejected » tab without deleting it, and « Restore » puts it back in the queue. You keep Inquiries clean while keeping a trace of the message.
Can the AI generate a quote on its own?
Yes, depending on your settings: when an inquiry is judged high quality, the AI can trigger quote generation. You remain free to review it before sending.
How many channels can I connect?
All the channels in the « Sources » tab (your business email, Instagram, WhatsApp Business, Aircall, Chrome extension) can run in parallel, along with each venue's lead form. The more you connect, the more Inquiries covers all your sources.
Can I find an inquiry I already processed?
Yes: open the « Accepted » tab for converted inquiries, or « Rejected » for those you rejected. Nothing is deleted unless you choose « Delete inquiry ».
Can I change the order of the queue?
The queue is sorted by arrival date, newest at the top. To focus on what's urgent, apply a filter (« Source », « Platforms », « Date range ») rather than following the raw order.
See also
- Process an inquiry
- Understand the AI score
- How AI qualifies your inquiries
Bring every event inquiry into one queue.